Monday, August 1, 2011

Red Wagon 2

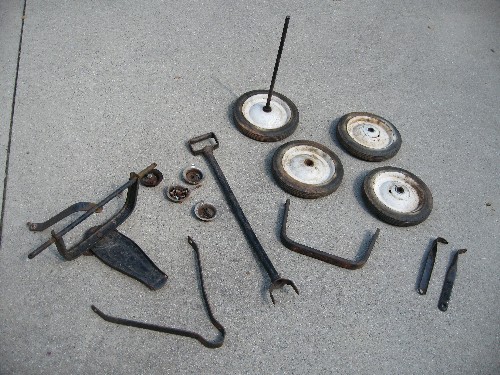
After taking it apart this is what I have to work with.


I straightened the peg  with a pair, shown above, with a pair of pliers and pulled it out. I plan to use the same pegs, rather than fabricate my own or purchase any.


The rust has to be sanded and removed.


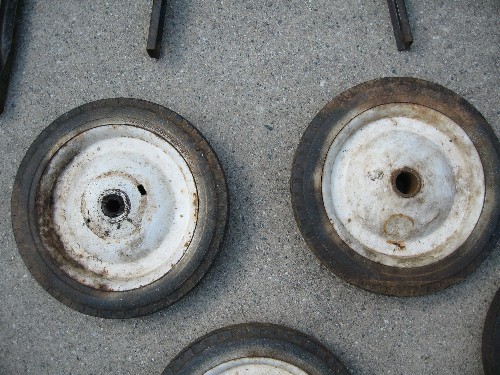
The wheels aren't in bad shape, although comparing the wheels in the picture above, one can see that the one on the right is missing a thing that fit in the center of the wheel.


One axle was difficult to remove from the wheel.


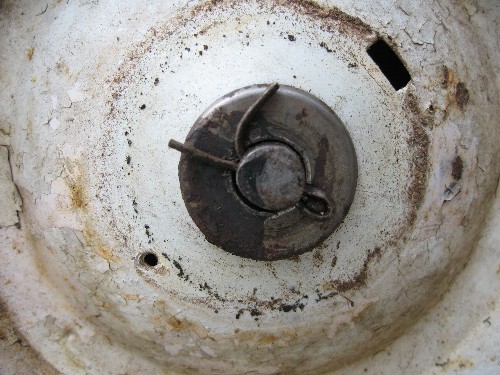
The wheel above looks worse than it really is.


I don't know if that is rubber or something else between the axle and the wheels (shown above). I plan to make something to replace the one that's missing from one wheel. It probably corroded away at one point.


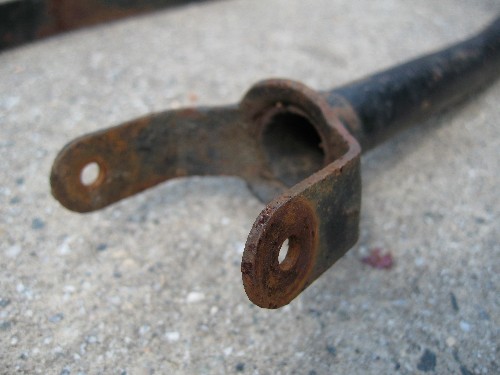
The two support beams show how one of them is bent. Rather than straighten it out I plan to have it straighten out when I screw it to the platform I make. The only part that could be banged back without worry of metal fatigue is the hole where the screw goes in. A simple bang with a hammer against a flat surface will do the job.


It's always good to save the nuts and bolts until replacements are purchased. This way I can assess the threads, and length of the screws. Of course in this case, it's not a big deal.


<-----Previous----- | -----Next----->

Tuesday, July 26, 2011

Red Wagon 1

On Saturday, July 23, 2011 I went to a yard sale and found the rusty frame and wheels of an old red wagon, like the kinds children used to play with.


The frame is in pretty good shape, with only one bent support beam, and a couple dents in a tire. I plan to dismantle the thing, strip off the old paint, remove the rust, give it a fresh paint job, and restore it to better than it's former glory.


The closer view of the wagon in the above picture, illustrates it's condition. There are a lot of rusty areas including a heavily rusty hub cap on a wheel that has a dent on it's inside and outside parts.


The center pivot axle, doesn't turn and is heavily rusted.


The hub caps attach by one screw. The paint on the wheel, as can be seen is cracking and needs to be replaced.


Many screws are  heavily rusted and need to be replaced, along with their respective washers.


The above picture shows a close up of the condition the center pivot axle is in.


Fortunately, the wheels and the axles running to them are in solid shape and can easily be cleaned up.


Remnants of the wooden platform of the wagon.


Not all of the screws were in rough shape, although replacing them too is of the essence. The finished project will look better if all the screws looked the same.


This screw looks like it will have to be cut in order to remove.


The above support beam is the only major area which has significant bending. Rather than beat it out however, I hope it will straighten out once I mount the platform to it, which I plan on building. This will minimize any metal fatigue which may be incurred by hammering it back out.

Overall, the appears to be a fairly easy project and I look forward to completing it and sharing photos of the end result.
<-----Previous----- | -----Next----->


Yard Saling On Saturday, July 23, 2011

I hit a few yard sales with a friend this past Saturday morning. It was the first one I've been on in over 5 years so it was a lot of fun. I purchased a couple of items which will make great fun projects, one item is an antique demijohn bottle in a crate which I have an idea of what I can do with it, and it will not be invasive to the item so it will not ruin it's value. I will share more of this on a later post. I also purchased the frame and wheels to a red wagon toy. I plan to restore it to better then it's former glory. With these two projects imposed on me from my latest yard saling excursion,  it dawned on me that I should share these projects with the world. I also plan to share a few previous cool projects that I have done so stay tuned.